Ankündigung zur Welle 2 bei FFG: "Here They Come"

"Only the fighters are attacking… I wonder what those Star Destroyers are waiting for."
–Lando Calrissian
Those Imperial-class Star Destroyers aren't waiting any longer… They're coming in the second wave of expansion packs for Star Wars™: Armada!
Imperial-class Star Destroyers, MC80 Mon Calamari cruisers, Raider-class corvettes,Slave I, the Millennium Falcon, and more! They're all coming in Armada Wave II, and the shots these ships will fire are bound to shape the course of the Galactic Civil War.
- Imperial-class Star Destroyer Expansion Pack
- MC30c Frigate Expansion Pack
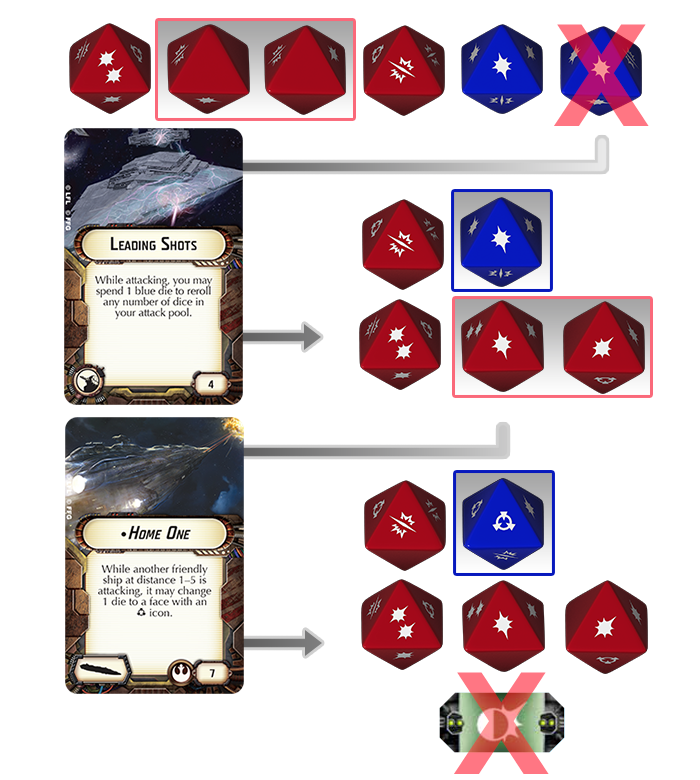
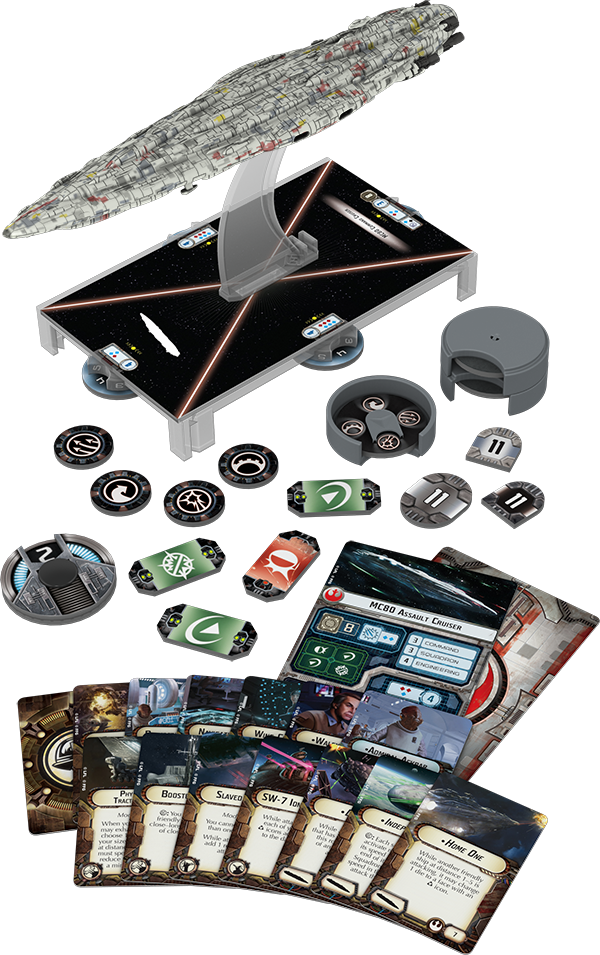
- Home One Expansion Pack
- Rogues and Villains Expansion Pack
- Imperial Raider Expansion Pack
In Wave II, you'll find the game's first large ships and Rogue squadrons that can both move and fire during the squadron phase. You'll benefit from a wealth of new firepower matched only by the myriad layers of new tactical possibilities. Wave II also marks the introduction of a host of commanders, officers, crew, upgrades and ace pilots, and you'll find such renowned heroes and villains as Han Solo, Boba Fett, and Admiral Ackbar, alongside a new commander version of Darth Vader.
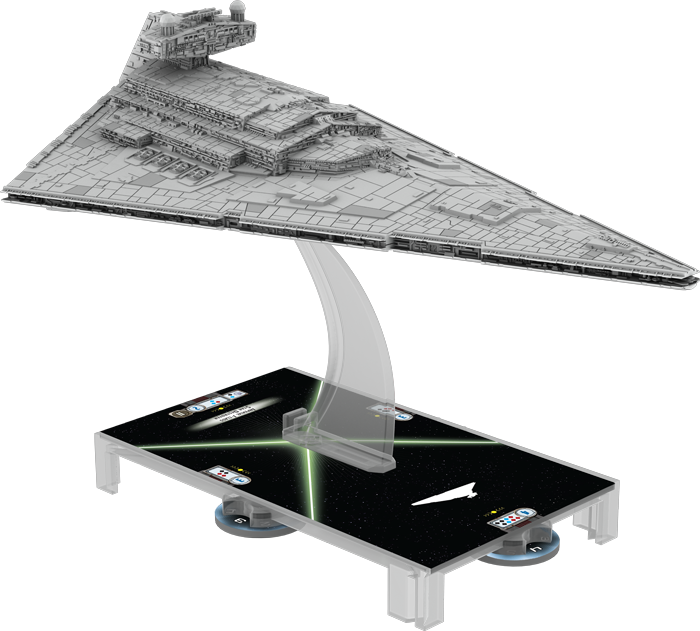
Imperial-class Star Destroyer Expansion Pack
At the height of the Galactic Civil War, the Imperial-class Star Destroyer was the commanding cornerstone of the Imperial Navy. Measuring 1,600 meters in length, a single Imperial-class Star Destroyer would boast a crew of more than 37,000 and carried a standard complement of four TIE fighter squadrons, one TIE interceptor squadron, and one squadron of TIE bombers. It could also carry an entire legion of stormtroopers, along with AT-ATs, AT-STs, and other landing craft. Most importantly, each Imperial-class Star Destroyer sported armament powerful enough to bring wayward systems to heel under Imperial control.
The Imperial-class Star Destroyer Expansion Pack brings this behemoth battleship to your games of Armada with one pre-painted miniature, two ship cards, three command dials, eighteen upgrades, and all requisite tokens.

Moreover, even as it affords you the opportunities to snare your foes with a tractor beam and fly your fleet to battle under the command of Darth Vader, the Imperial-class Star Destroyer Expansion Pack introduces a new type of defense token to your Imperial fleet: the Contain defense token. Featured on both the Imperial I-class and Imperial II-class Star Destroyers, the Contain token can cancel the standard critical effect of a shot that passes through your shields to your hull. Given the devastating nature of many of the critical effects in the Armada damage deck, the Contain token is a valuable tool that you'll want to spend wisely as you use your Star Destroyers to spread fear throughout the galaxy.
MC30c Frigate Expansion Pack
One of the most powerful mid-level ships in the Galactic Civil War, the MC30c frigate was of Mon Calamari design and presented a lethal combination of speed, high-powered armament, and advanced deflector shields. The trade-off, however, was that the ship was relatively light on hull plating. This trade-off becomes evident, as well, in the MC30c Frigate Expansion Pack, which offers this ship to the Rebel Alliance as a fast, nimble, small-size vessel that can fire as many as five attack dice from its left and right hull zones. However, to do so, it must get within close range of enemy ships where its shields won't long protect it from taking damage against its four hull points.

In addition to its pre-painted MC30c frigate miniature, this expansion pack contains two command dials and ten upgrade cards, along with all the tokens you need to bring this Rebel ship to battle. Of course, as with other Armada expansion packs, the MC30c Frigate Expansion Pack also comes with two ship cards that let you field your MC30c as either the MC30c Scout Frigate or MC30c Torpedo Frigate. Though they share many of the same design elements, the different costs and battery armaments of these two different configurations ensure a wide range of tactical flexibility for your MC30c.
Home One Expansion Pack
"All craft, prepare to jump into hyperspace on my mark."
–Admiral Ackbar
Admiral Ackbar and his flagship star cruiser, Home One, arrive to Armada in the Home One Expansion Pack. Featuring one large-size, pre-painted miniature MC80 star cruiser, two ship cards, three command dials, and fourteen upgrades, the Home One Expansion Pack gives the Rebel Alliance a ship that can trade blow for blow with nearly any Imperial vessel.

Boasting battery armaments of six dice from both its left and right hull zones, the MC80 star cruiser is as hard-hitting as a Victory-class Star Destroyer and the Rebellion's best answer to the Imperial-class Star Destroyer. Better yet, this Mon Calamari starship is even more powerful when flown under the command of Admiral Ackbar, who can add two red attack dice to any attack made by a starship that fires only from its left and right hull zones during its activation.
Will you race your star cruiser boldly down the middle of the Imperial fleet, firing at enemy ships on both sides? Will you dare your opponent to allow you the use of the Advanced Gunnery objective? Or will you circle the Imperial fleet at a distance, taking shots from a battery armament enhanced by Admiral Ackbar, Slaved Turrets, and the Defiance title? No matter how you bring it to battle, the MC80 star cruiser gives you the muscle to employ a whole new set of tactics in your battles for galactic freedom.
Rogues and Villains Expansion Pack
Han Solo, Boba Fett, and a handful of the galaxy's most notorious rogues and villains race to the battlefield in the Rogues and Villains Expansion Pack for Armada!

Featuring some of the Star Wars galaxy's best known freighters, patrol craft, and bombers, the Rogues and Villains Expansion Pack introduces eight new irregular squadrons to Armada, each of which can be represented by either a non-unique squadron card or flown by an ace. Like the squadrons from the Core Set and the first wave of expansions, these come unpainted, but are presented in colors that complement their fleets.
Meanwhile, since these squadrons include the signature starships of some of the galaxy's most individualistic pilots, each is represented by a single miniature, and several of them allow you to take advantage of the new Rogue keyword, which grants a squadron the ability to both move and attack when it's activated during the squadron phase. Still, that's not the only new keyword introduced in this collection; both the Grit and Intel keywords appear on a number of its squadrons and introduce new tactical abilities that can help you steer the course of your Armada conflicts.
Imperial Raider Expansion Pack
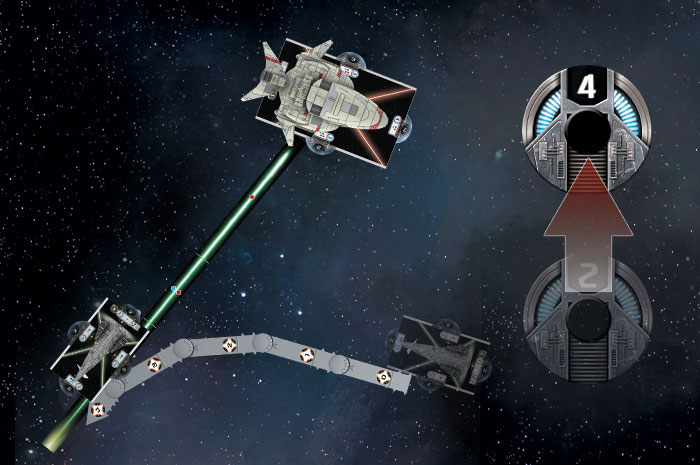
First introduced to the world as a huge starship designed for Epic games of X-Wing™, the Raider-class corvette is the Empire's response to the need for a designated anti-fighter vessel. Its six dual heavy laser cannons are more accurate against snubfighters than the turbolaser batteries of its Star Destroyer cousins, and the disruptive effects of its ion cannon emplacements, along with the efficiency of its localized command, make it a powerful addition to small strike forces.

This potent anti-fighter starship enters Armada in the Imperial Raider Expansion Pack. The second small ship for the Imperial Navy, the Raider is a quick and nimble ship that excels at dealing with pesky starfighter squadrons, but it can just as easily dart across the battlefield to pour concentrated fire into the broadside of a Rebel cruiser. Whether you field your pre-painted miniature as a Raider I-class Corvette or Raider II-class Corvette, the Imperial Raider Expansion Pack offers you plenty of ways to customize it for battle with either squadrons or capital ships. Among its eight upgrade cards, you'll find Ordnance Experts, a new commander, Quad Laser Turrets, two unique titles, and more.
Of course, as always, the Imperial Raider Expansion Pack comes with a command dial, speed dial, and all the tokens you need to enter the fray.
The Heat of Battle
"General, there’s a fleet of Star Destroyers coming out of hyperspace in sector four."
–The Empire Strikes Back
Across the world, players have recently begun to explore Armada and its battles. Rebel and Imperial forces clash in heated contests for the fate of the galaxy. Rebel corvettes and frigates do their best to resist Imperial Star Destroyers, even as their ace starfighter pilots seek desperately for some means to cripple larger ships. Now, as their conflicts continue to intensify, Armada players can rest assured that the game's biggest battles are still ahead!
This is the promise of Armada Wave II. Your Star Wars fleet battles are nowhere near finished. They're only heating up. The five expansion packs in Wave II will soon flood the battlefield with even more iconic starships, advanced technology, and daring pilots. Field the first large ships and the first small ship for the Imperial Navy, trust your Rogue squadrons to harass your foes, and pour overwhelming firepower into the flanks of your enemy's ships.
The five expansion packs of Armada Wave II are scheduled to arrive in the third quarter of 2015!


Zuletzt bearbeitet: